各種參數與接收
在上一篇已經實做過兩種協定類型的API了,常用的協定有get、post、put、patch和delete五種。在這邊我們用get和post兩種作示範,在下一篇再繼續測試另外三種和如何進行選擇。
好的,API在呼叫的時候有兩種方法可以帶參數到後端過去。第一種是用網址帶參數,第二種是帶到body裡面傳到後端去。這邊我們先實作get,前往"views/test.ejs"
views/test.ejs
<!DOCTYPE html>
<html>
  <head>
    <title>測試頁面</title>
    <link rel='stylesheet' href='/stylesheets/style.css' />
  </head>
  <body>
    <h1>這是測試頁面</h1>
    <p>Welcome to 這是測試頁面</p>
    <button id="callGetApi">GET API</button>
    <br>
    <button id="callPostApi">POST API</button>
    <br>
    <a href="./">前往首頁</a>
    <script>
        let callGetApiButton = document.getElementById('callGetApi');
        callGetApiButton.addEventListener('click',async function(){
          let result = await fetch('/test/get?id=helloworld').then(res=>{
            return res.text();
          })
          alert(result);
        })
  </script>
  </body>
</html>
接著前往"routes\test.js"增加路線
routes\test.js
略
router.get('/get', function(req, res, next) {
  res.json({
    status: 'OK',
    value: 'hello get!建立好囉!'
  });
});
module.exports = router;
打開伺服器用遊覽器前往test頁面(http://localhost:3000/test ),應該會看到兩個按鈕。按下GET API這個按鈕就能看到目前的成果
接著實作參數,讓我們在發出請求的時候多一段"?id=hellword"
views\test.ejs
略
        let callGetApiButton = document.getElementById('callGetApi');
        callGetApiButton.addEventListener('click',async function(){
          let result = await fetch('/test/get?id=helloworld').then(res=>{
            return res.text();
          })
          alert(result);
        })
略
回到伺服器取得該參數
routes\test.js
略
router.get('/get', function(req, res, next) {
  res.json({
    status: 'OK',
    value: 'hello get!建立好囉!',
    query: req.query
  });
});
module.exports = router;
重新開啟伺服器後回到頁面(http://localhost:3000/test ),參數就會被帶回網頁
好的,接著實作另一種網址參數帶法!更改"views\test.ejs"
views\test.ejs
略
    <button id="callGetApi">GET API</button>
    <button id="callGetApi2">GET API2</button>
略
        <script>
略
        let callGetApi2Button = document.getElementById('callGetApi2');
        callGetApi2Button.addEventListener('click',async function(){
          let result = await fetch('/test/get/12345678?id=helloworld').then(res=>{
            return res.text();
          })
          alert(result);
        })
        </script>
  </body>
</html>
接著前往建立路線
routes\test.js
略
router.get('/get/:id', function(req, res, next) {
  res.json({
    status: 'OK',
    value: 'hello get2!建立好囉!',
    query: req.query,
    params: req.params
  });
});
module.exports = router;
重開伺服器後到網頁點擊GET API2就能到結果
有看出區別了嗎?在第二個範例中我們將路由設定成了動態路由"/get/:id'"也就是說這個路線後面會被認為是參數並可以在伺服器使用"req.params"進行撈取,跟利用"?"後帶參數不同且不會互相影響。這樣兩種網址帶參數的方式就實現了,這邊有點複雜建議多看幾次反覆推測之後再繼續看如何帶資料。(這邊能推測出來並會用很重要,因為下一篇會繼續實作並運用這部分的用法。)
如果上面你已經可以推測出大概了,那就開始帶資料吧。前往"views\test.ejs"
views\test.ejs
略
<script>
略
        let callPostApiButton = document.getElementById('callPostApi');
        callPostApiButton.addEventListener('click',async function(){
          let result = await fetch('/test/post/12345678?id=helloworld',{
            method: 'post',
            body: JSON.stringify({
              id: 987654321
            }),
            headers: {
              'content-type': 'application/json'
            },
          }).then(res=>{
            return res.text();
          })
          alert(result);
        })
  </script>
  </body>
</html>
為什麼不用get??因為get沒有body這個東西,所以沒辦法把資料藏起來。接著建立路線
routes\test.js
略
router.post('/post/:id', function(req, res, next) {
  res.json({
    status: 'OK',
    value: 'hello post!建立好囉!',
    query: req.query,
    params: req.params,
    body: req.body
  });
});
module.exports = router;
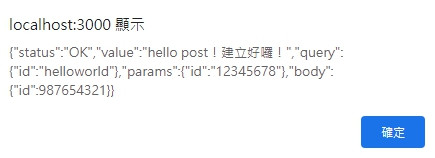
重新開啟伺服器後,回到網頁按下post api吧
這樣各種帶資料的方式就算是學習完成,且"動態路由"的概念在框架使用也會用到,明天會進行其他協定的製作並說明如何選擇。基本上程式碼幾乎都一樣,就是協定上的不同而已。可以自己先試試看,利用今天的內容去推測其他協定如put、patch和delete並不會太困難,請務必反覆推敲並試試看。


![[day12][註冊][實作] 串接,雲端MongoDB Atlas資料庫(上)](https://blogger.googleusercontent.com/img/b/R29vZ2xl/AVvXsEgLwMKTRB6O6vB2T6YZ5Noa6u6PG-kK7MD7TZozfGVj3qVPcduL4cRyMXWczOu1-dgUeqPcXW8vmGZVwEetPOW3jYfU0OznZ7rKHCarCL0A3Aate9_xpZK8mspraQl181QI7qrXVJcU9iN7/w100/pexels-pixabay-270632.jpg)
![[day15][全端][學習] EJS,長的跟HTML87%像的樣版語言](https://blogger.googleusercontent.com/img/b/R29vZ2xl/AVvXsEiAdPt8gokd9p1VAFqMl9vCsEDq1HhbMQkQBhS3SFZhD3vHisl271X-JKvjNe_K8neG7OiCqkuTJ4kcYUN610wIBlUIQasjHhgclQwlu2U8tzYDIw87HJXlvyTJH2Pqej6rk_8Q0DdRyF9o/w100/pexels-pixabay-248515.jpg)
![[day13][後端][學習] 串接,雲端MongoDB Atlas資料庫(下)](https://blogger.googleusercontent.com/img/b/R29vZ2xl/AVvXsEjHPh-qsFa_3ytSZGfF_d50HN6msX2T-u9GoR_2Dnx5qg99tM1b5Bb6lbChghpOMrULccwyfvHxH5nteOP3Fo091vjhSQhY0F0ychqnaRTJGVuHrvYDHo3QVDHZxqRXujyEeWQwxFFtqjQi/w100/pexels-rodrigo-santos-3888151.jpg)
![[day16][前端][學習] 試著套用BS模板,讓你的網站一臉就是bootstrap](https://blogger.googleusercontent.com/img/b/R29vZ2xl/AVvXsEjO-BauH-334iBdWqmlRUzoaeWILjXMn6DgK4CJ8rzqjWSijRBy7d3kHwFMhkxoNVzNeKGEPbsb6SY1OiFBYAf-6HsrAjpENujLOi18apQe7HaW6kPyEULDPJy3BoM_2qd14DsYhhoWFwf8/w100/pexels-negative-space-169573.jpg)
![[day10][註冊][實作] 沒朋友就用LineBot機器人做一個(上)](https://blogger.googleusercontent.com/img/b/R29vZ2xl/AVvXsEjU__hLZ7pNUNJAzQgmVUJBXSC0HuUlwP4SsbrFdETfcbHTOmy2m59us1vp8uurIQnu9Mt5PljTBZBHTnqAAm-bgCWy1XyTH7cop36CyR1aulnZ2yEwtdof2QyWtbhVMHSfzQOaGkjZKfwL/w100/pexels-pixabay-270373.jpg)
0 留言