

前情題要
上一篇在加入許多套件模組,許多的設定檔後已經讓你的webpack可以轉譯Vue相關的程式了,這篇就開始引入"Vuex"和"vue-router"吧
首先安裝兩個模組吧
npm i vue-router@next --save
npm i vuex@next --save
在Vue的進入點建立Vue實體的時候追加引入兩個模組
src\client\main.js
import { createApp } from 'vue';

import App from './app.vue';
import router from './router';
import store from './store';
略
createApp(App).use(store).use(router).mount('#app');
依照vue結構建立"router"和"store"並建立以下檔案內容
src\client\router\index.js
import { createRouter, createWebHashHistory, createWebHistory } from 'vue-router';
import home from '../views/home.vue'
const routes = [
  {
    path: '/',
    name: 'home',
    component: home,
  }
]
const router = createRouter({
  history: createWebHistory(),
  // history: createWebHashHistory(),
  routes
})
export default router;
src\client\store\index.js
import { createStore } from 'vuex'
export default createStore({
  state: {
    store: 'Vuex'
  },
  getters: {
  },
  mutations: {
  },
  actions: {
  },
  modules: {
  }
})
最後修改"app.js"檔案追加"router-view"和引入Vuex就可以了
<template>
  <div class="container">
    hello {{state.message}}
    <router-view
      class="main_container"
    />
    hello {{ vuexName }}
  </div>
</template>

<script>
import { reactive, computed } from 'vue';
import { useStore } from 'vuex';
export default {
  setup () {
    const state = reactive({
      message: 'Vue3'
    })
    const store = useStore();
    const vuexName = computed(() => store.state.store);
    return {
      state,
      vuexName
    }
  }
}
</script>
略
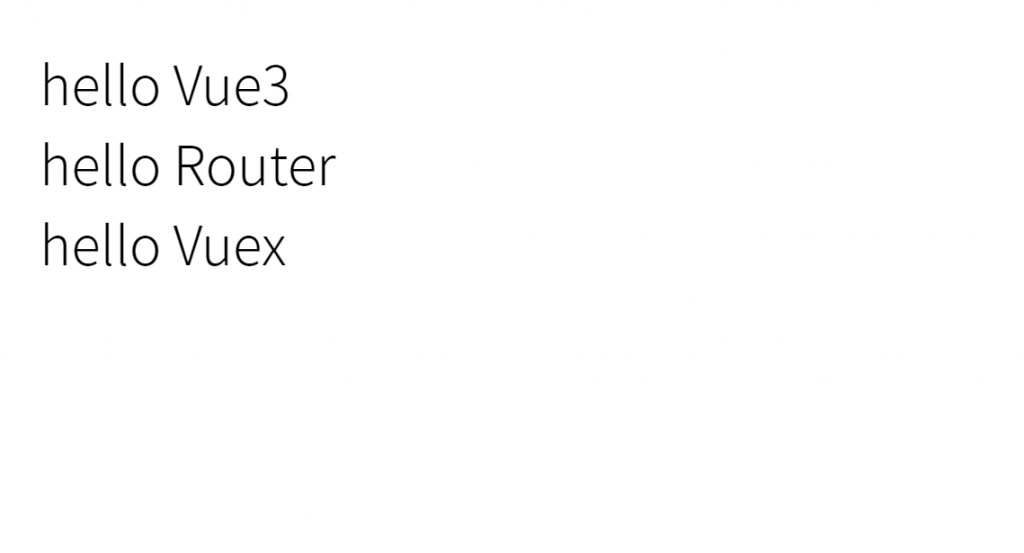
完成,現在畫面上出現三個hello world了!
完成,今天的工作就是這樣~!

![[day12][註冊][實作] 串接,雲端MongoDB Atlas資料庫(上)](https://blogger.googleusercontent.com/img/b/R29vZ2xl/AVvXsEgLwMKTRB6O6vB2T6YZ5Noa6u6PG-kK7MD7TZozfGVj3qVPcduL4cRyMXWczOu1-dgUeqPcXW8vmGZVwEetPOW3jYfU0OznZ7rKHCarCL0A3Aate9_xpZK8mspraQl181QI7qrXVJcU9iN7/w100/pexels-pixabay-270632.jpg)
![[day15][全端][學習] EJS,長的跟HTML87%像的樣版語言](https://blogger.googleusercontent.com/img/b/R29vZ2xl/AVvXsEiAdPt8gokd9p1VAFqMl9vCsEDq1HhbMQkQBhS3SFZhD3vHisl271X-JKvjNe_K8neG7OiCqkuTJ4kcYUN610wIBlUIQasjHhgclQwlu2U8tzYDIw87HJXlvyTJH2Pqej6rk_8Q0DdRyF9o/w100/pexels-pixabay-248515.jpg)
![[day13][後端][學習] 串接,雲端MongoDB Atlas資料庫(下)](https://blogger.googleusercontent.com/img/b/R29vZ2xl/AVvXsEjHPh-qsFa_3ytSZGfF_d50HN6msX2T-u9GoR_2Dnx5qg99tM1b5Bb6lbChghpOMrULccwyfvHxH5nteOP3Fo091vjhSQhY0F0ychqnaRTJGVuHrvYDHo3QVDHZxqRXujyEeWQwxFFtqjQi/w100/pexels-rodrigo-santos-3888151.jpg)
![[day16][前端][學習] 試著套用BS模板,讓你的網站一臉就是bootstrap](https://blogger.googleusercontent.com/img/b/R29vZ2xl/AVvXsEjO-BauH-334iBdWqmlRUzoaeWILjXMn6DgK4CJ8rzqjWSijRBy7d3kHwFMhkxoNVzNeKGEPbsb6SY1OiFBYAf-6HsrAjpENujLOi18apQe7HaW6kPyEULDPJy3BoM_2qd14DsYhhoWFwf8/w100/pexels-negative-space-169573.jpg)
![[day10][註冊][實作] 沒朋友就用LineBot機器人做一個(上)](https://blogger.googleusercontent.com/img/b/R29vZ2xl/AVvXsEjU__hLZ7pNUNJAzQgmVUJBXSC0HuUlwP4SsbrFdETfcbHTOmy2m59us1vp8uurIQnu9Mt5PljTBZBHTnqAAm-bgCWy1XyTH7cop36CyR1aulnZ2yEwtdof2QyWtbhVMHSfzQOaGkjZKfwL/w100/pexels-pixabay-270373.jpg)
-vuex,router)
0 留言